This blog post accompanies a demo I did for my Intro to Azure DevOps talk with the Northeast Ohio Women in Tech group. I’m breaking this up into multiple parts in order to talk through the Azure App Service adventures. We will try to stay within the browser so that we don’t have to install a development environment locally.
In Part 1, we looked at the Azure DevOps + Azure App Service integration using Azure Repos and building with the App Service Build Service.
In Part 2, we are going to look at using Azure Pipelines and Azure DevOps to deploy to Azure App Service. When you have custom build steps – such as enforcing coding rules with linters, this is the route to go.
Note: This blog post shows a lot more than what we glossed over in the NEOWIT demo. This post will include the azure-pipelines.yml file as well as setting up the release in Azure DevOps.
For both of these posts, we will be using the .NET 6 Hello World Azure sample.
Prerequisites
The prereqs from Part 1 apply to this.
You will also need to fill out an Azure DevOps Parallelism Request. This is needed in order to run the builds in Azure DevOps on Microsoft-hosted agents. Note: This process takes 2-3 business days, so do this and come back here once it’s granted.
You can learn more about parallel jobs and costs here: Configure and pay for parallel jobs.
Carrying over from Part 1
We will be using the same code from Part 1. If you haven’t gone through this yet, see Import the code.
Create the Azure App Service
We want to create a second web app so that we can configure its deployment to use Azure Pipelines instead of the App Service Build Service. Follow the steps in Part 1 to create a web app. Only go through the steps to create the web app. Do not set up the integration in the deployment center.
Create the Azure Pipeline
Once the web app is created, then you can set up an Azure Pipeline in Azure DevOps to package the code. We will use Azure Pipeline to run a linter for code formatting and build our code. We will use the Releases feature of Azure DevOps for the deployment.
- Navigate to your Azure DevOps project. Go to the Pipelines section.
- Select Create Pipeline.
- Connect to your Azure Repo for this project.
- On the Configure your pipeline step, select Show More to see more options. Select ASP.NET Core.
Your YAML will look like this:
# ASP.NET Core
# Build and test ASP.NET Core projects targeting .NET Core.
# Add steps that run tests, create a NuGet package, deploy, and more:
# https://docs.microsoft.com/azure/devops/pipelines/languages/dotnet-core

trigger:
- master

pool:
  vmImage: ubuntu-latest

variables:
  buildConfiguration: 'Release'

steps:
- script: dotnet build --configuration $(buildConfiguration)
  displayName: 'dotnet build $(buildConfiguration)'
This YAML sets the pipeline for building a .NET Core application. So let’s update our YAML with the following steps:
- Convert the current code to a job.
- Add a step for publishing the code.
- Add another job for linting.
Updating current code in job format
Since we are going to have multiple jobs, we need to add a jobs label to our YAML. Each job will be noted by job:. This is the updated azure-pipelines.yml file with configuring for jobs.
# ASP.NET Core
# Build and test ASP.NET Core projects targeting .NET Core.
# Add steps that run tests, create a NuGet package, deploy, and more:
# https://docs.microsoft.com/azure/devops/pipelines/languages/dotnet-core

trigger:
- master

jobs:
  - job: build
    pool:
      vmImage: ubuntu-latest

    variables:
      buildConfiguration: 'Release'

    steps:
    - script: dotnet build --configuration $(buildConfiguration)
      displayName: 'dotnet build $(buildConfiguration)'
Publishing the code
We need to add a step for publishing our built code as a ZIP file for deployment.
- Select Show assistant. We want to use the assistant to help us build our YAML.
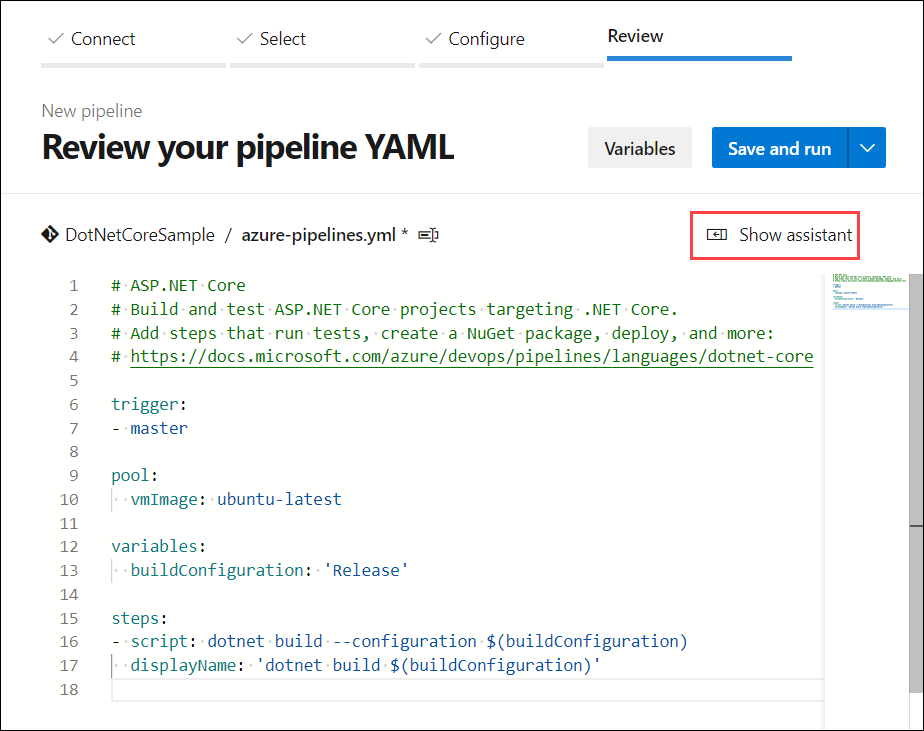
2. Search tasks for .NET Core. Select .NET Core.
3. For the .NET Core step, set the Command to publish . Make sure the following options are checked (enabled):
- Publish web projects
- Zip published projects
- Add project’s folder name to publish path
4. Select Add. This should add the necessary YAML for publishing your project. You may need to adjust spacing accordingly.
5. We need to add another task to expose the artifact for the pipeline. Using the assistant, search for the Publish Pipeline Artifacts task.
6. Give your artifact a name – such as DotNetCoreSample. Keep the Artifact publish location set to Azure Pipelines. Again, you may need to adjust the spacing.
Your azure-pipelines.yaml file should look like this:
# ASP.NET Core
# Build and test ASP.NET Core projects targeting .NET Core.
# Add steps that run tests, create a NuGet package, deploy, and more:
# https://docs.microsoft.com/azure/devops/pipelines/languages/dotnet-core

trigger:
- master

jobs:
  - job: build
    pool:
      vmImage: ubuntu-latest

    variables:
      buildConfiguration: 'Release'

    steps:
    - script: dotnet build --configuration $(buildConfiguration)
      displayName: 'dotnet build $(buildConfiguration)'

    - task: DotNetCoreCLI@2
      inputs:
        command: 'publish'
        publishWebProjects: true

    - task: PublishPipelineArtifact@1
      inputs:
        targetPath: '$(Pipeline.Workspace)'
        artifact: 'DotNetCoreSample'
        publishLocation: 'pipeline'
7. Select Save and Run.
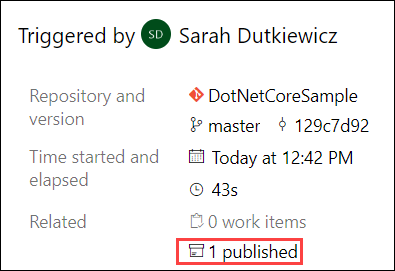
Once the pipeline is done running, on its summary, you should see the repository information, commit information, timing, as well as 1 published artifact.
Create the release
Once the artifact is created, then it can be deployed to the Azure App Service.
- Navigate to your Azure DevOps project. Go to the Pipelines > Releases section.
- You should see a message showing “No release pipelines found”. Select New pipeline.
- The Select a template dialog will appear. Select the X in the upper right to close it. We will come back to this.
Add the artifact
We are going to add the artifact created by the pipeline. We will also set this release pipeline to use continuous deployment. So once we commit to our branch, the build pipeline will run. Once that build pipeline is run successfully, then it can trigger this release pipeline to automatically deploy our changes.
- In the Artifacts section, select + Add. Set the following details:
- Source type: Build
- Project: DotNetCoreSample
- Source (build pipeline): DotNetCoreSample (or whatever you may have named the pipeline created above)
- Default version: Latest
- Source alias: _DotNetCoreSample
2. Select Add.
3. On the release pipeline creation page, select the lightning bolt icon on the newly-created artifact.
4. Enable the continuous deployment trigger.
5. Under Build branch filters, select + Add.
6. For the filter, set the following values:
- Type: Include
- Build branch: master
7. Select the X at the top right of the Continuous deployment trigger dialog to close the dialog. This will preserve your changes.
Add a release stage
Before you can save a release pipeline, you need to add at least one stage. We are going to create a release stage to deploy our artifact to the web app we created earlier.
- In the Stages section, select + Add > New stage.
- In the Select a template dialog, search for Azure App Service deployment. Then select Apply.
- Name your stage. Stages could be something like Dev, QA, and Production. If you have multiple sites sharing a code base, each stage could be a site name. Stages can serve multiple purposes. Select the X at the top right of the Stage dialog to close the dialog. This will preserve your changes.
- On the newly created stage, select 1 job, 1 task. We need to configure the deployment.
- Select the stage name. There should be 3 parameters that need set:
- Azure subscription: Select your Azure subscription. You may need to select Authorize to authorize your subscription for this process.
- App type: Select either Web App on Windows or Web App on Linux, depending on the operating system you chose for the web app created earlier.
- App service name: Select the name of the created web app.
7. Select New release pipeline. Rename it to Deploy NET Core Hello World.
8. Select Save. Keep the default Folder. Select OK.
Make a change to the code
Now that the build and release pipelines are built, let’s make a change that will show how these come together.
- Navigate to your Azure DevOps project. Go to the Repos section.
- Within the file structure, navigate to Pages/Shared/Index.cshtml.
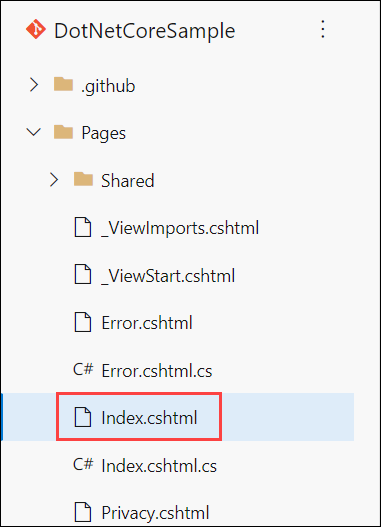
3. Select Edit.
4. Change “.Net” to “.NET”.
5. Select Commit.
6. Commit this change to the master branch. Select Commit.
Confirm pipelines run
Since you committed to the master branch, this should trigger the build pipeline.
- Confirm that your pipeline is running by navigating to Pipelines > Pipelines.
- Select the pipeline name to see the runs.
- Select the run to see the run details. The commit message will appear in the run name.
- Once the build pipeline is complete, navigate to Pipelines > Releases.
- You should see your release deploying to the stage you configured.
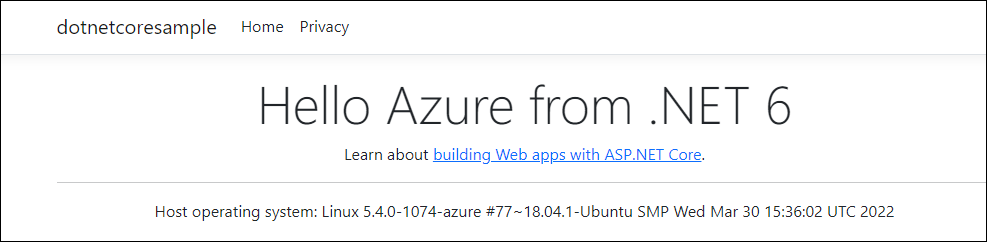
Confirm the changes are deployed
Once the release is complete, then you can confirm the changes are deployed.
- Navigate to the release.
- Select Deployment succeeded to get the deployment details.
- Select the Deploy Azure App Service step. The logs will include the URL for the application. Select the URL and confirm that the changes appear.
Conclusion
In this post, we:
- Created a new Azure App Service.
- Created a build pipeline in Azure DevOps.
- Created a release pipeline with continuous deployment in Azure DevOps.
- Made changes that were then built and deployed by these pipelines.
[…] Part 2, we are going to look at using Azure DevOps pipelines to deploy to Azure App Service. When you have […]